


Learn how to color Easter eggs with gel food coloring and rubber cement, a technique which produces some spectacularly high contrast & gorgeous abstract designs! Use it on blown-out eggs or dyeable plastic eggs to preserve these cool Easter eggs for years to come...

Coloring Easter Eggs With Rubber Cement
On the hunt for some new egg coloring ideas? I've got *JUST* what you've been searching for...
Coloring Easter eggs has always been one of my favorite Easter traditions, so I'm so excited to introduce you all to this beautiful rubber cement eggs technique... I mean, how amazing are these designs?!?
Coloring eggs with this process really could not be easier (kids can help!), and the brilliant contrasting colors are absolutely stunning!
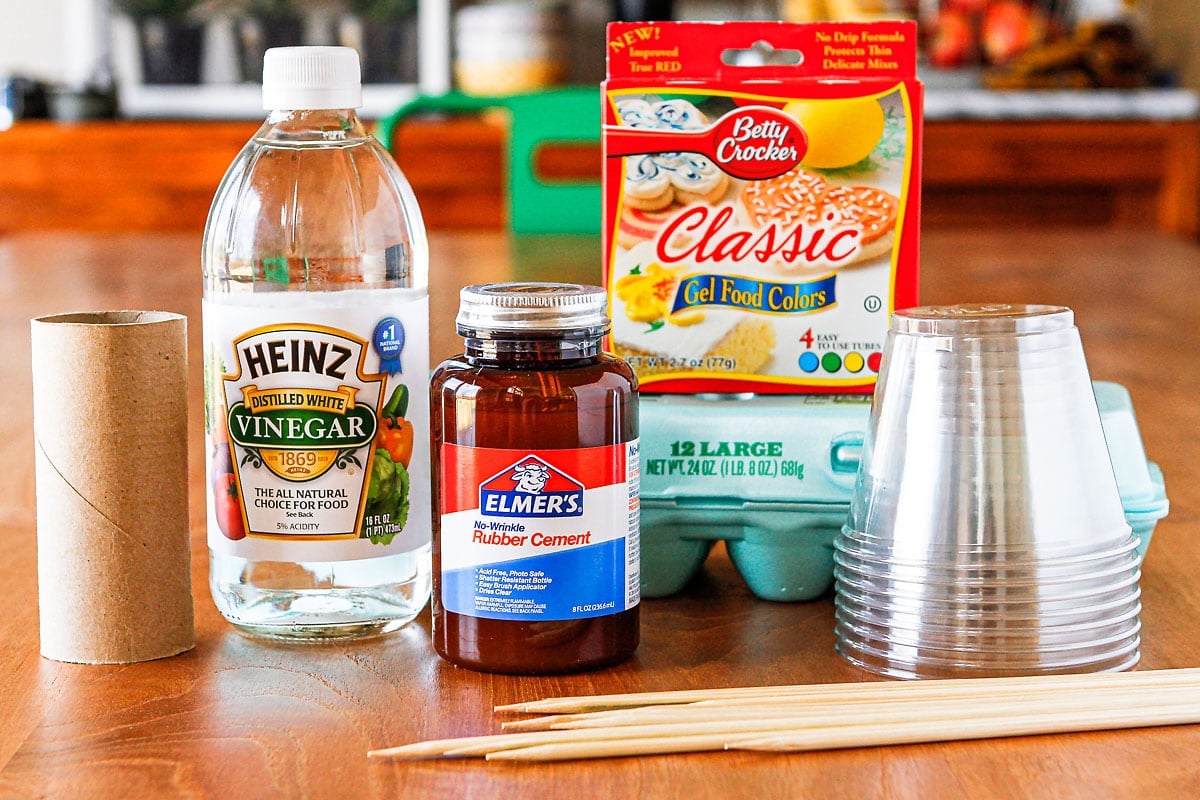
Supplies For Making DIY Easter Egg Dye
When it comes to dyeing Easter eggs, I much prefer to make my own DIY Easter egg dye using Betty Crocker Classic Gel Food Colors over the tablet kits that you can purchase. The colors always turn out super vibrant, and you can easily control the shades with a little creative mixing.
- blown-out white eggs (or dyeable plastic eggs)
- Betty Crocker Classic Gel Food Colors*
- white vinegar
- rubber cement
- water
- plastic cups (to mix the dye in)
- paper towel or toilet paper tubes
- scotch tape
*Be sure to buy the 4-ct. Classic colors gel food coloring set. I tried the Neon colors set, and the ingredients differ slightly, which led to some funky residue that stuck to the eggs.
PRO TIP: While I don't recommend using rubber cement on eggs you're planning to eat, the DIY egg dye CAN be used alone and is food safe. If you're going this route, my favorite method for boiling eggs for Easter is this Instant Pot hard boiled eggs technique.
However if you don't own an electric pressure cooker, try this baked hard boiled eggs method. It was my go-to for years before I got my Instant Pot!

DIY Egg Drying Rack
The first thing you'll need to do is create an egg drying rack. I've seen a number of approaches that use foam and pins or nails to make stands, but this toilet paper tube rack idea I came up with is far less expensive and works just as well!
Simply cut a toilet paper or paper towel tube in half lengthwise. Then cut strips horizontally and tape the ends together to create a smaller circle that's the perfect size for an egg to sit on. Hopefully you get the gist from the image above, but if you have questions, just ask!

How To Dye Easter Eggs With Rubber Cement
As I mentioned, dyeing eggs with food coloring and this rubber cement technique is really simple and easy.
First things first, you'll want to cover your work area to prevent stains. I also recommend setting both your dye cups and egg drying racks on rimmed baking sheets to help catch any accidental spills and/or drips.
Then just follow these steps for best results:
1| Using the water, vinegar, and gel food coloring, mix your desired dye shades according to the directions and color blending chart on the back of the Betty Crocker Classic Gel Food Colors package.
2| Start by dyeing your eggs a lighter base color. The actual color you select doesn't matter so much as the length of time you leave the egg in the dye in this initial step. Check them frequently and remove while the intensity of color is still low. Drain off the dye and allow the egg to dry completely.

3| Once the eggs are dry, it's time to apply the rubber cement. Holding an egg gently on either side, use the applicator brush to drizzle rubber cement over the egg in an abstract pattern. After a couple, you'll get the hang of drizzling while avoiding your fingers. Allow the rubber cement to dry thoroughly.
4| Now it's time to dye the eggs a second color. Choose a color that's going to have high contrast with the base color, and leave the eggs in the dye until the color is very intense. Once you're satisfied with the color, drain off the dye and allow the egg to dry completely again.
5| It's time for the magic to happen! When your egg is thoroughly dry, simply use your fingers to gently rub the rubber cement off the eggs, revealing the lighter base color.
If you've used blown-out eggs, be *very* gentle when removing the rubber cement, especially near the holes on either end. I damaged a couple of my favorite patterns when I was a little too rough when rubbing it off.

My Favorite Color Combinations
While I stuck with two dye colors for these images, you can get really creative with this method and make these Easter egg decorating ideas your own.
For example, you can pair three or more colors to create some pretty awesome effects. Just apply a little more rubber cement after each color application, and dye in successively darker colors.
I'd have to say my favorite combinations are the super high contrast colors, like the purple/orange and pink/yellow eggs. But I also think the more tonal blue/green and purple/blue eggs are pretty spectacular, too.
Get a little crazy and try different color combinations! If you're not happy with the way one is turning out, you can just slip it into another color and dye over it until you're satisfied.
NOTE: Several readers have questioned whether hard boiled eggs are safe to eat after using this technique. I'm going to err on the side of caution and say NO, I don't recommend eating them. Rubber cement isn't food safe, and eggshells are fairly porous - not a good combination.
However, the DIY gel food coloring egg dye by itself IS food safe. So you can safely use it on hard boiled eggs that will be consumed. If you'd like to dye hard boiled eggs that you plan to eat later on, I'd suggest using the egg dye for them first.
Then you can reuse the same dye with the rubber cement technique on hard cooked eggs that you DON'T plan to eat, blown-out eggs, or dyeable plastic eggs!

How To Color Easter Eggs With Rubber Cement & Gel Food Coloring
Helpful Equipment
- disposable plastic cups
- empty toilet paper tubes
- scotch tape
Supplies
Instructions
- Using the water, vinegar, and gel food coloring, mix your desired dye shades according to the directions and color blending chart on the back of the food coloring package.
- Start by dyeing your eggs a lighter base color. The actual color you select doesn't matter so much as the length of time you leave the egg in the dye in this initial step. Check them frequently and remove while the intensity of color is still low. Drain off the dye and allow the egg to dry completely.
- Once the eggs are dry, it's time to apply the rubber cement. Holding an egg gently on either side, use the applicator brush to drizzle rubber cement over the egg in an abstract pattern. After a couple, you'll get the hang of drizzling while avoiding your fingers. Allow the rubber cement to dry thoroughly.
- Now it's time to dye the eggs a second color. Choose a color that's going to have high contrast with the base color, and leave the eggs in the dye until the color is very intense. Once you're satisfied with the color, drain off the dye and allow the egg to dry completely again.
- It's time for the magic to happen! When your egg is thoroughly dry, simply use your fingers to gently rub the rubber cement off the eggs, revealing the lighter base color. If you've used blown-out eggs, be *very* gentle in this step, especially near the holes on either end. I cracked a couple of my favorite patterns when I was a little too handed in removing the rubber cement.
How-To Notes
Featured Products


More Easter-Related Recipes
If you like these fun Easter eggs, you might also enjoy these other Easter-related recipes:
- Carrot Patch Easter Dirt Cups
- Easter Peeps Bird's Nest Recipe
- My Favorite Instant Pot Hard Boiled Eggs Method
- Hard Boiled Eggs In Oven Method (my previous fave!)
- Classic Egg Salad Recipe
Did you make this recipe?
Tag @unsophisticook on Instagram and hashtag it #unsophisticook.


Lisalia says
Every year my kids want to do the fun egg dying techniques but I just don't want to buy the kits in the store... This is a fun and easy way to get it done at home with items we already have on hand. Thank you for this easy to follow instruction outline. My kids will love it!
Claudia Lamascolo says
Thank you for taking the time for these easy great instructions the kids had a blast!
Melissa says
Amazing! We tried this and ours came out great! What a fun idea!
Krissy Allori says
These are just so cute!! I am saving this to do with my kiddos. Loved the egg drying hack too. Thanks!
Sara Welch says
I have never seen this technique before, but it looks awesome! My kids will love to try this out this year!
Anna says
These eggs are absolutely gorgeous! My kids loved this technique!
Erin says
These are so bright and colorful! Love the designs that you can come up with too!
Rachael Yerkes says
These eggs are so cute!!!!
Stephanie says
I never knew you could use rubber cement...what a great idea!
Sommer says
The coolest looking Easter eggs I've ever seen!
Courtney O'Dell says
This is so genius! I love how bright and fun they turned out!
Alison says
Could you use hot glue if you didn't have rubber cement?
Tara @ Unsophisticook says
Hi Alison! Sorry I missed your question over the weekend. I haven't tried using hot glue, but my guess is it would probably be difficult to remove, especially if you're using blown-out eggshells, which are very fragile. Did you happen to give it a try?
Julie Kreh says
How much vinegar/water do you use?
Tara @ Unsophisticook says
Hi Julie! The dye instructions are on the back of the Betty Crocker Gel Food Colors packaging, but it's 1/2 cup of hot water + 1 teaspoon of vinegar + 1 teaspoon of gel food color. Hope that helps!
Sami says
How long does it take for the first dye to dry and then for the rubber cement to dry? Or just the whole process for one egg, how long does it take?
Tara @ Unsophisticook says
Hi, Sami — good question! I'd say one egg start to finish took about 25 minutes, but I had multiple batches of eight going at once. I had eight colors of dye prepared, so while one batch was drying, I was dyeing another batch. I think I let the first coat of dye dry around 5 minutes, and then I dabbed any damp areas with a paper towel. The rubber cement takes around 10 minutes to dry, and then after dyeing, I waited until they were completely dry before removing the rubber cement.
Rae says
For those of you questioning whether or not these eggs are safe to eat, I believe you missed a key part of this. These are blown out eggs. This means that she has literally blown out the yolk and inner sac using small holes she's made in the shells. Unless I am missing something and you guys find egg shells by themselves appetizing, then no. These are not edible after being made with this technique. I suppose you could blow out the egg sac and yolk into a bowl and use them to make scrambled eggs possibly but that's about it! Lol
Anna says
Is it safe to consume the boiled egg after using the rubber cement method?
Tara @ Unsophisticook says
Good question, Anna! We don't usually eat the eggs that we color, but I should have anticipated that some readers might. I did some research on the method, and though I found that a lot of people who've used it do eat the eggs, I'm going to err on the side of caution and discourage readers from eating them. Rubber cement is not food safe and eggshells are fairly porous, so I'd say it's not recommended. I'm going to add a note to the post with this info. Thanks!
Becca Glenn says
Most stores now carry fake dyeable eggs (SO much easier than hardboiling real ones) - so I think it'd probably be best to use this method on those.
Tara @ Unsophisticook says
Oh, I've seen those at Walmart! I haven't tried them, but I'd think they should work with this method. As I mentioned in the post, you can also use blown out eggs, which is another good option if you want to reuse them year after year.
lisa says
Rubber cement is fun to do. Try doing a third round - rubber cement over 2nd dye then dye with 3rd color. You wouldn't want the second dye super dark for this.
A similar idea is to use the clear wax crayon that some kits come with. Draw some lines or swirls, dye the egg, when dry draw some more lines or swirls. repeat 2-4 times. Start with lighter colors then end with darker. wax should be clear enough to see colors thru it. or melt off in the oven on your lowest setting for 5-10 min then carefully wipe with paper towel. caution not to burn yourself.
Lori in NY says
Your eggs turned out really cool looking! I don't think I'd use hard boiled eggs though to be safe. Eggs are porous and the cement has some pretty nasty chemicals in it that I wouldn't want my family to ingest!
Lori @ http://www.healthyshoppersclub.wordpress.com
;-)
Tara @ Unsophisticook says
Thanks, Lori! I agree, and I'm adding a note to the post with the info I've found on the topic.
Jill says
this is a really fun idea! I think my daughter will have such fun making these, thank you for posting this !!!