

This simple and easy salt dough recipe is the perfect rainy day activity... Kids will master valuable kitchen skills while learning how to make salt dough, and then spend hours playing with it!
Salt Dough Recipe for Kids
We encourage our kids to get outside and play as much as possible during the summer, but inevitably there's going to be those rainy days when outside play isn't an option - like today...
Rather than turning to video games and television for entertainment though, I gathered up my younger three children for a quick kitchen lesson on how to make salt dough. And it actually turned out to be loads of fun AND educational! #momwin
BTW: This easy Oobleck recipe is another fun rainy day activity!
"It worked perfectly!"
I sized down the recipe but it still worked perfectly! I'm making ornaments for my family with this and I'm waiting for them to bake now. Thank you so much!

Learning How To Make Salt Dough
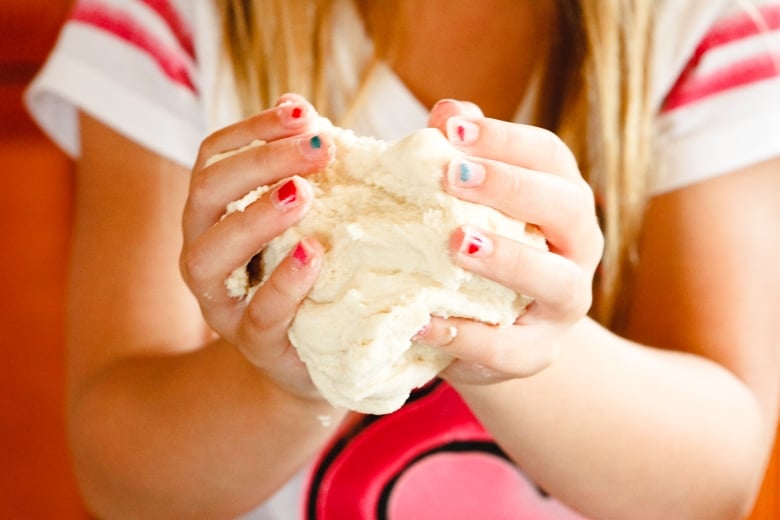
While my kids think making and playing with this salt dough recipe is all fun and games, they're actually learning a whole slew of valuable skills - like brushing up on their math, how to measure solids and liquids, and what happens when you mix certain ingredients. Just to name a few!
And with only three ingredients - flour, salt, and water - this simple salt dough recipe is the perfect intro to kitchen basics. Luckily, I picked up some inexpensive fresh flour and salt at the grocery store earlier this week in anticipation of a rainy day!

I gave Camden the job of measuring out the flour, showing her how to level it off for a consistent measurement.
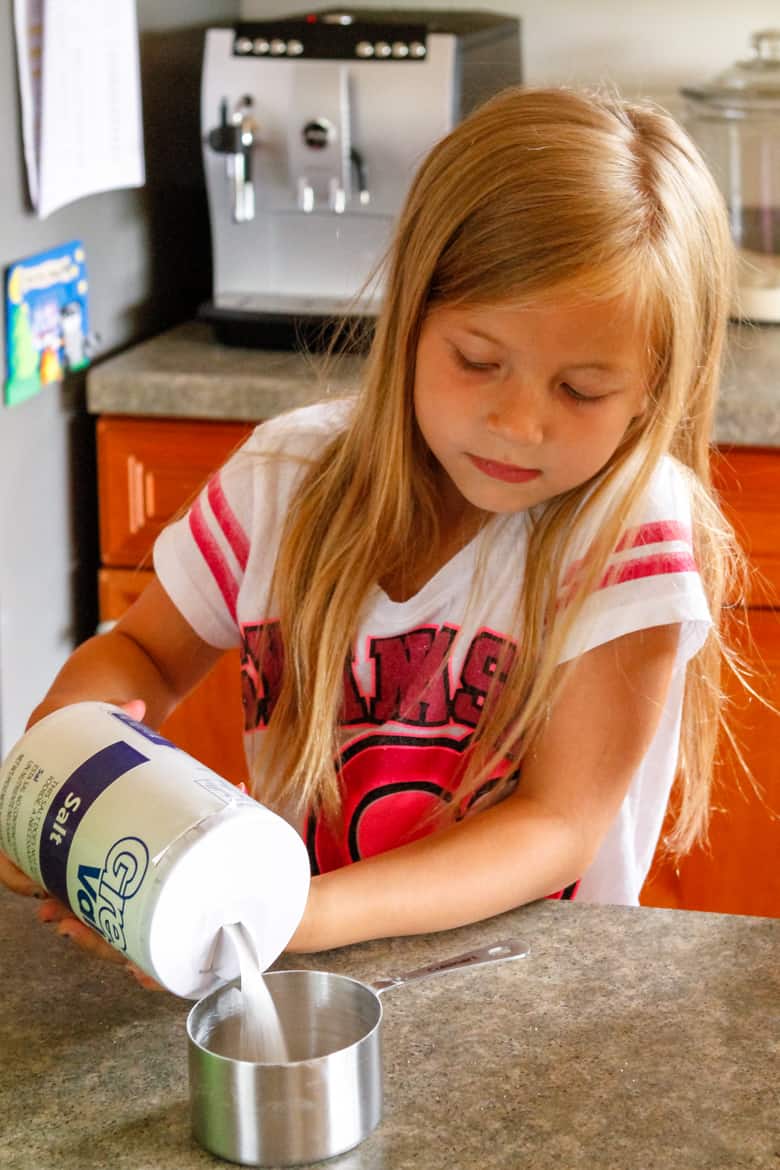
Addie measured the salt, again leveling it off using a butter knife.
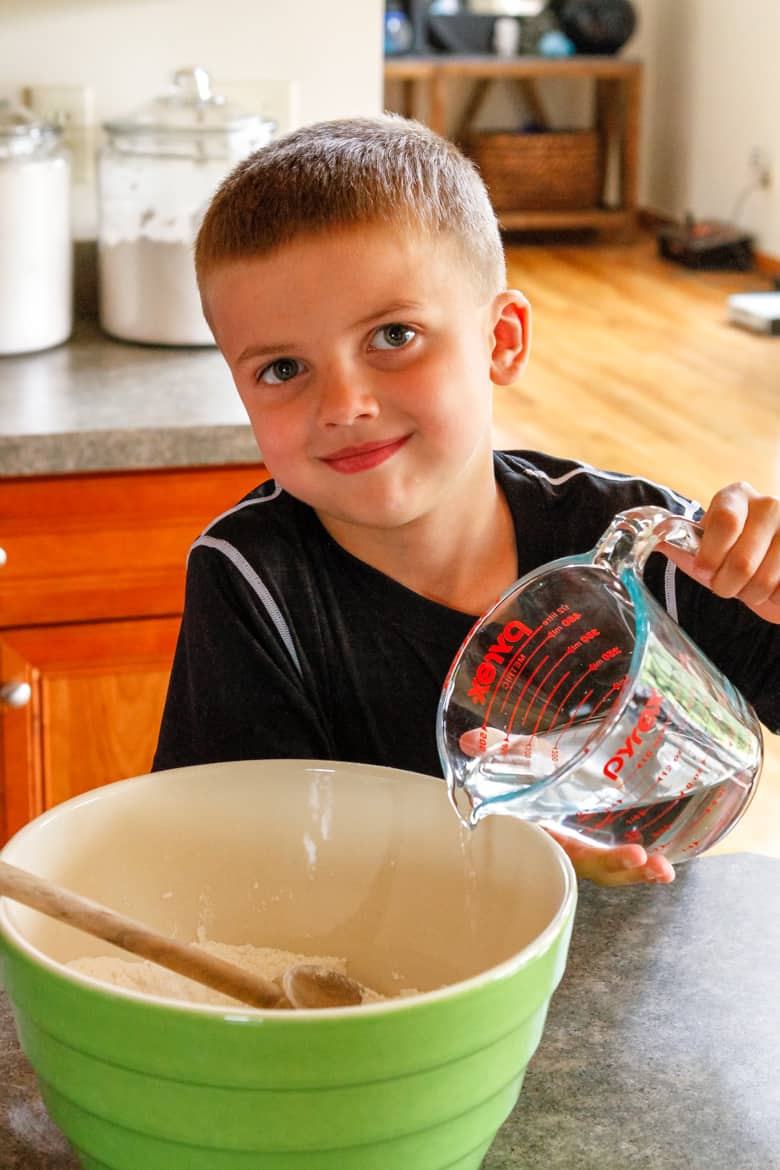
And I helped Drew measure the water, showing them all how the liquid should be level with the lines on our Pyrex measuring cup.

Then they all took turns mixing the salt dough, and I gave a quick demonstration on how to knead dough. You know they were getting quite antsy to start playing by this point!
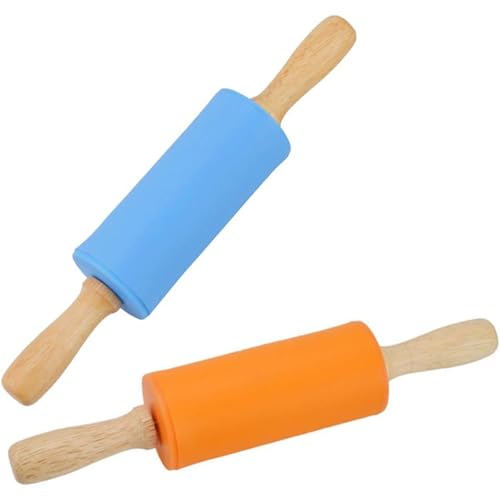
They had a blast playing with their salt dough. I gave them a couple kid-sized rolling pins and some cookie cutters to use. This kept them busy ALL afternoon! These plastic clay tools are super inexpensive and would be fun to play with, as well.

No Bake Salt Dough Recipe
You can store salt dough in an airtight container for future use. Or you can let your creations dry and paint them with acrylic paints.
If you do want to speed up the drying process by baking them, just place your salt dough crafts on a baking sheet and pop them into a 200-degree oven. Baking time will vary based on the size and thickness of your crafts, so just keep a close eye on them.
Reader Tip: Independent Work Recipe Ratio
I am a Montessori teacher and have adapted the recipe to make it an independent work for each child from start to finish. I thought I would share the ratios, if anyone is interested.
- ½ cup flour
- ¼ cup salt
- ¼ cup water
Thank you for sharing, Samantha!
Printable Recipe ↓

3-Ingredient Salt Dough Recipe
Ingredients
- 2 cup all-purpose flour - or gluten-free flour
- 1 cup Morton salt
- 1 cup warm water
Instructions
- Combine the flour and salt in a large mixing bowl. Gradually add a little water at a time, mixing as you pour, to form a ball of dough. Using a dough whisk will make mixing easier for young children.
- Knead the dough for 7-10 minutes, until the dough has a smooth, firm Play-Doh like consistency. Additional water may be needed, depending upon humidity.
- Store the salt dough for future use in a Ziploc bag or airtight container to prevent it from drying out.
How To Air Dry Salt Dough
- For best results, place pieces on a screen to allow both sides to dry out equally. Alternatively, you can turn them regularly while drying.
- Allow pieces to sit out at room temperature for least 48 hours, until they are rock hard and have a white, limestone-like appearance.
How To Bake Salt Dough
- Heat the oven to 250℉. Arrange the pieces on a oil-covered baking sheet.
- Baking time will vary depending on the size and thickness of your crafts. Turn each piece frequently while baking, so that they dry out evenly. If an area puffs up, poke a hole in it with a pin or toothpick to release the air.How Long To Bake Salt Dough: For each ¼" in thickness, allow approximately a half hour of baking time, or bake until surface turns light golden brown. Allow the pieces to cool thoroughly before handling.
How-To Notes
Featured Products


More Fun Activities For Kids
If you enjoyed making this recipe for oobleck, you might also enjoy these other fun activities for kids:
- Easy 2-Ingredient Oobleck Recipe
- 4-Ingredient Glitter Slime
- DIY Easy Bake Oven Mixes
Did you make this recipe?
I'd love to see how your salt dough crafts turn out... Tag me @Unsophisticook on Instagram or use the hashtag #Unsophisticook so I can check it out. Enjoy!


Anonymous says
This worked exactly as written, thanks!
Jenny Smith says
I tried this recipe and me and my kids loved it, we ate the whole bowl!
Kennedy hambel says
you ate the salt dough?
auria rojas says
my kids loved it
Willow says
Absolutely loved this as a kid! Did it with my nanny kids. Super easy and they had a blast for an hour. Although they did pour the whole jar of salt haha!
Tara Kuczykowski says
LOL, kids will be kids! So happy you all had so much fun with it... I used this same recipe when I was the arts & crafts counselor at a summer day camp and I'm pretty sure it was the campers favorite activity. :)
Amelia says
Absolutely love it. A great idea you should try is salt dough BABIES. It's great for responsibility!
Have a number 1 day!
Luv ya!
Th th says
I’ve tried a few different ways of making this and I like this recipe the best. Use warm water
Luna Moon says
I sized down the recipe but it still worked perfectly! I'm making ornaments for my family with this and I'm waiting for them to back now! Thank you so much!
Wyatt says
not that easy to clean of
Rose says
My daughter used this recipe for a project it went very well.
Rebecca says
So funny to happen upon your recipe and see that we have two of our three kids with the same names, Addie and Camden (mine is a boy Camden though). Thanks for the recipe and the laugh.
Tara Kuczykowski says
Aww, love it!!
Nicole says
Do you know how many pounds this recipe weighs once it is made?
Tara Kuczykowski says
Hi Nicole! This recipe will make around 1.75 lbs. of salt dough.
SH says
Does it matter what type of flour (like can you use coconut, cassava, etc)?
Does it matter what kind of salt (iodized, table, epsom,etc)?
Tara Kuczykowski says
I have only tested it with regular all-purpose flour and gluten-free flour, so I'm not sure how well other flours would work. I've always just used regular table salt when making it!
Annie Lee says
How long will the dough last/stay moist if wrapped and stored airtight in the fridge?
Tara Kuczykowski says
Hi Annie — you can make salt dough ahead of time and refrigerate it in a tightly sealed Ziploc bag for up to 7 days.
Kate Griffith says
Thanks for this recipe. I want to make a fairly large 'faux plum pudding' so I will be putting this dough into a mold. What to you suggest to keep the mold shape and allow the dough to come out of the mold. Would you line the mold with plastic wrap or spray the mold with cooking spray or do nothing at all. I would also bake this to dry it, so I'm thinking a few hours in a low 150 - 200 oven might be appropriate. After that I would let it air dry for about a week before painting it, does that sound right? Also, are mice likely to want to nibble at this mixture...I don't think so, but I need to be sure. Thank you in advance for your help.
Tara Kuczykowski says
Hi Kate — great questions! I would recommend the inner surface of the mold lightly with cooking oil before pressing the dough in. A large piece like this will take quite a while to dry thoroughly, so I think starting the process in the oven and then letting it finish with a long air dry sounds like a good plan. Mice shouldn't disturb this mixture, but you definitely will want to seal it after it's dry. Most paint (except water colors) is sufficient to seal it, if you're painting all sides. But if you really want to be sure it's sealed well, I'd recommend a coat of shellac, acrylic sealer, lacquer, or varnish on all sides.
Susan says
What type of varnish?
Tara Kuczykowski says
Oh goodness, this was so many years ago... Pretty sure my parents just used some leftover clear varnish from another project. I think an oil-based spray varnish, like this Varathane would work well. The one I linked is a satin finish, but it also comes in a gloss finish.
Nancy says
I was looking for a simple salt clay recipe, as I had forgotten how to make it. This recipe is spot-on, right on the money. Easy enough for adults to make! Years ago I made salt clay Christmas ornaments with my Mom and brother, and we had so much fun doing it, made them like cookies, they lasted for years. We stored them wrapped up to protect them. One thing that I would mention is that if you are going to save them, in order to do so, I would very strongly advise you to coat each piece with a sealant like those used for acrylic paints. I had some in storage in Honolulu, and when I checked them, they had been chewed on by insects. So if you want to save them, use a sealant! The ones used on acrylic paints are easier to use, and kids could do the painting under adult supervision, of course. I give this recipe a five star rating! You can teach baking by baking your ornaments too. :)
Tara Kuczykowski says
Oh, I love hearing these stories! We made Christmas ornaments with it too when I was little, and if I recall correctly, my dad sealed them with varnish. Unfortunately, we lost them several years later when our basement flooded. My kids are older now, but I think this would be a fun project for us to do together this year!
joy says
@Nancy,
We painted them with water colors since that is all that I had at the time. My son was 2. That was 44 yrs ago. I stored them in a shoe box in a plastic tote in the basement without any problems and they have remained nice all these years. We never varnished them or sealed them either.
Kind of amazing!
Emma says
How long would it take to let the salt dough dry out naturally
Tara Kuczykowski says
Hi Emma! It's going to vary a bit based on how thick your project is and how humid your climate is. For something that's relatively thin, it shouldn't take more than a day or so. I always like to flip them so they can dry evenly and not warp.
Andrea says
Is it easy to sculpt?
irene krueger says
how much does this make
Tara Kuczykowski says
Hi, Irene! This recipe makes approximately 2.5 cups of salt dough.
Lucy Armstead says
@Tara Kuczykowski,
Tara,
I love salt dough ornaments. Some of my co-workers years ago gave them as gifts. I think I will try making them for next xmas!
Tara Kuczykowski says
Yes, they are so pretty! We didn't get around to making some this year, but I've definitely got it on my to do list for next year.
irene krueger says
good
Natalie says
My teen daughter made a ghost shaped trinket plate, and for the black eyes and mouth, she added activated charcoal powder to turn it black. So excited to see it baked!
Tara Kuczykowski says
Sounds adorable!!
Catherine says
I am making relief maps with 14 6th graders. Our map is a little larger than an adult fist. Any idea on number of batches?
Tara Kuczykowski says
Hi Catherine! The recipe makes about 2.5 cups of dough. I'm estimating you'd need approximately 1.5 cups per student, so I'd say about 9 batches would work with room for error. Hope that helps!
Elyssa says
it was to sticky after i added more flour.
Tara Kuczykowski says
Hi Elyssa! It sounds like you just need to continue to add more flour while kneading it until it reaches the proper consistency. It can vary depending on the moisture content of your flour and how arid or humid the climate you live in is.
Denise says
I can’t wait to use ur recipe for our gingerbread unit! Great for ornaments for our 3 yo kiddos!! Thank w!
Tara Kuczykowski says
Have fun making some great memories, Denise!
Toni Rickborn says
Can you add food coloring to the mix?
Tara Kuczykowski says
Hi Toni! Yes, you can definitely add food coloring to the mix — either add it to the water (less messy) or work it in after.
Hannah D says
How long does salt dough last after being baked? I am looking to turn it into cookie stamps for a Christmas gift, and I am wondering if it will be safe.
Tara Kuczykowski says
Hi Hannah! As long as you prevent it from getting damp, it should last pretty much indefinitely. When I was little, we rolled it out and used cookie cutters to make Christmas ornaments. My parents put a coat of clear varnish on them, and we used them every year for many years!
Philippa Clarke says
This was brilliant! Our daughter wanted to make a nest for her pterodactyl toy so we made 1/4 of the amount, kneaded in some moss and grass, formed it into a nest shape and baked it gently for about 20 mins. So much fun!
Tara Kuczykowski says
I love this so much! So happy that my recipe could help you make such wonderful memories with your daughter.
Jinal says
Can salt dough keepsake be stored widoud baking it... How to dry them widoud oven or microwave
Tara Kuczykowski says
Hi Jinal — yes, you can definitely air dry them! It can take several days or up to a week or so to fully dry, though, depending on the humidity. I recommend turning them over about once a day to allow them to dry evenly. I do not recommend trying to dry anything created with salt dough in the microwave.
Jinal says
Ohhkk... Thanks a lot for your reply... Wl wl surely try it
Rea says
This is sooo cool! Love this. Makes great mothers day gifts!!!
Leslie says
Hello, trying to find things to keep my kids busy during quarintine. Decided to make an easter tree. So kids made cut outs of easter eggs, we're baking them now and will paint them. So much fun.
Tara Kuczykowski says
I LOVE this, Leslie! So happy to help out in any way I can.
Lisa says
I am thinking of doing this with christmas tree cookie cutters for about 60 kids. Any idea how many batches I might need?
Tara Kuczykowski says
Hi Lisa! It's going to depend on the size of the cookie cutters, but I'd think you should be able to get 10-12 cutouts per batch. I think I might make 7 batches just to be safe and account for any mishaps.
Desiree says
Hey guys?m! Do you have to bake the cookies ? Or can just be patient and let them dry out?
Tara Kuczykowski says
Hi Denise! You can definitely let them dry out — just make sure to turn them every other day so they dry evenly. Just be aware that it can take quite a while if you live in a very humid area.
Angela says
Thanks for the wonderful recipe and inspiration. Can’t wait to make these for our preschool plastics free makers mart! Something to consider is if it’s necessary to suggest the plastic tablecloth. This type of disposable plastic can’t be recycled and is a huge problem for our oceans, animals and kids future. Here’s a link where kids/students can learn more about what helping with a little clean up can help prevent. https://education.nationalgeographic.org/resource/great-pacific-garbage-patch/
Thanks for the awesome post! A
Tara Kuczykowski says
Thanks for the great information, Angela! An extra large baking sheet would work well for protecting tables for those looking to go plastic free.
nina says
hi! its unclear whether you mean 200 degrees farenheit or celsius. I'm assuming farenheit but i could be wrong.
though i understand why cooking time could vary quite a lot, what indicate that these are done? if we cant go by cooking time, and unlike a cake or loaves of bread we cant go on the browning of the crust. what would be the best way to tell when its done?
ive just popped some of these guys in the oven. the dough itself was straightforward and reliable. i ended up using a bit more flour to have the dough come together a bit better.
Tara Kuczykowski says
Good question, Nina! You're right to assume Farenheit — you're just trying to dry them out slowly. You'll know they're done when they don't have a wet look to them in the center anymore. I always flip them over and put them back in for a little while longer, because often the back side will still look wet in the center. Hope that helps!
Addelyn says
Amazing used it for a christmas presnt for my parents
Danielle says
Would my students be able to build snowmen using this?
Tara Kuczykowski says
Hi Danielle! Yes, you could build snowmen with it. I'd recommend sticking cut drinking straw down the center to stabilize them while they're drying. Also, make sure the dough isn't overly wet to prevent sagging.
samantha says
I am a Montessori teacher and have adapted the recipe to make it an independent work for each child from start to finish. I thought I would share the ratios, if anyone is interested.
1/2 cup flour
1/4 cup salt
1/4 cup water
Tara Kuczykowski says
Wonderful — thank you so much for sharing, Samantha!
Monica says
@samantha, thanks! I was about to ask that question, the proportions for one kid
Lynn Ware says
Thanks for the recipe! I'm an elementary art teacher (268 students, 1st-6th grade). I don't usually take on 'big' projects, as I don't have an assistant, but I'd love to try and do this as a Christmas project. Do you know about how many ornaments one batch makes? thanks again!
Tara Kuczykowski says
Hi Lynn! That IS a big project, but I was an arts & crafts camp counselor after high school, and I managed to pull it off for our Christmas In July project... What size ornaments are you thinking about making? For example, a handprint-style ornament is going to be larger and use more dough than a cookie-cutter cutout ornament.
Lynn Ware says
I'm thinking probably a cookie cutter size would be more ideal for us. But.... it may be easier doing the handprint so I wouldn't have any arguing about who has what cookie cutter! lol! I'm just kinda in limbo wondering what would be the more practical of the two! I only have 25 minute weekly classes & at least 5-7 minutes consists of instructions/cleanup so I need o make the best use of what little time I do have. Thank you so much!!!
Tara Kuczykowski says
You'll definitely be able to stretch the dough further with the cookie cutters. I'd say you could get around 5-6 handprint ornaments per batch, and at least double that with cookie cutters, depending on the size. When I made them at camp, we used the cookie cutter method, and I don't recall much arguing. I made the dough ahead of time, so I rolled it out and called them up in groups, which probably helped. If you're air drying them, allow plenty of time and flip them after a couple of days. It was a humid and rainy July that year, so I remember it taking FOREVER!
Ashley F says
The kids love making this with me! Such a fun activity.
Christina says
I'm making these as I'm typing this. I rolled it out on my counter and using cookie cutters I try to pick up the piece that I want and it just doesn't stay in the shape. Any suggestions I tired parchment paper didn't work. I rolled it out on the pan I'm using to bake them and I cut them out and took the extra stuff out and that was time consuming. Any suggestions would be great. Thank you
Tara Kuczykowski says
Hi Christina! If you're using them to make cookie cut-out style ornaments, you'll want to treat the dough like you would for a pie or sugar cookies. Don't over-handle it, and it might even help to chill it slightly. Be sure to use extra flour on the counter when rolling them out, and you'll want to roll it out to 1/4" thickness or even slightly thicker. If the dough seems too sticky or flimsy, add more flour a little at a time until it holds its shape.
Erin | Dinners,Dishes and Dessert says
My son definitely love this!
Ashley F says
This stuff is awesome! The kids love making their creations with this!
Kara says
Oh man, this brings back fond memories. My mom used to make salt dough and let us make our own Christmas ornaments. It was so much fun! I need to start the tradition with my daughter!
Tara Kuczykowski says
We always did the same! I remember my dad gave them a coat of varnish so we could reuse them every year.
Liz says
This is such a fun activity for the kids! I love how many different things you can make with it too!
Aimee Shugarman says
This is perfect timing! I am looking to make some homemade ornaments this year!